In any art-form, it's important to identify a focal point and spend extra time adding an appropriate amount of detail and work to it in order to bring life and personality to your project. In game development we call this "polish". You can polish every little part of your project until your eyes bleed but it's not going serve much purpose if you don't spend most of your time working on the foundations of your game. If you finish a piece of code and you're sure that it's not going to change much throughout the remainder of the game, you can polish early. Otherwise, try to put it off as long as you can. There are going to be times where you're going to toss entire game mechanics. It's obviously better not to polish those pieces until you've decided. It's all about timing, and no one is perfect at that, but everyone gets better with experience.
In VR, the focal points are usually objects you're able to pick up, or characters that interact with you. To make the player feel like there is something deeper than a flat lifeless 3D model, you should add animations, interaction scripts, and haptic feedback(controller vibration)*. For example, seeing swords collide with "clanking" sounds and physics is one thing, but to feel your sword grinding against a metal surface (or the increasing tension in your bowstring) is on another level. It's the layer of feedback that pushes you over the edge, where you allow yourself in a certain respect, to believe the ruse.
What is important in a VR water balloon?
When you shake a balloon it should jiggle, it should deform from the water sinking on one side or the other based on gravity and how the player is tilting it, and it should pop in a satisfying way. Water balloons are satisfying to pop. Keep that in mind when you're designing things based on 'satisfying feelings', what is it that is satisfying, what is supposed to be enjoyable about this thing?
In this section I'm going to walk you through the parts of the water balloons in Plunker in 5 sections.
Notice that everything we're doing is basically polish, but when I was first creating this balloon mechanic I grey-boxed everything first. "Grey-boxing is the traditional technique of blocking out the level with simple shapes to see if the level design supports the gameplay before creating the final art assets for the level". If you end up not liking how the scripts and interactions turn out, this is where you may decide to toss something. Try to always grey-box things first (or make very quick minimal models if you feel like you need to).
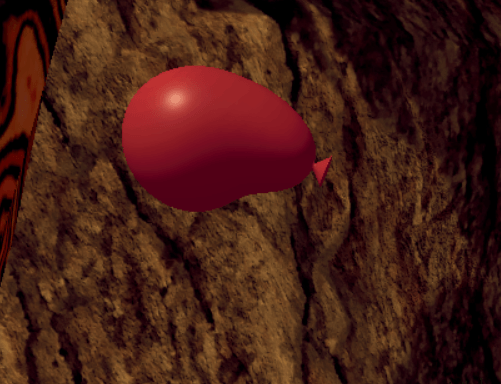
When beginning this balloon mechanic, I first thought of it as an interactive object which means that it has multiple states and transitions between them. The model we're creating below is what you hold and throw, most of the time it will be "popped" or basically non existent. We can talk more about the transitions and states in the 2nd section since they are mostly code. But just keep in mind that I'm only walking through this section first because it's more visually appealing for the walkthrough.
Making the model
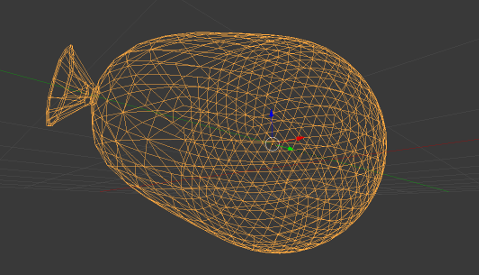
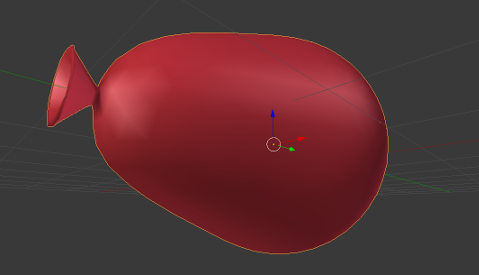
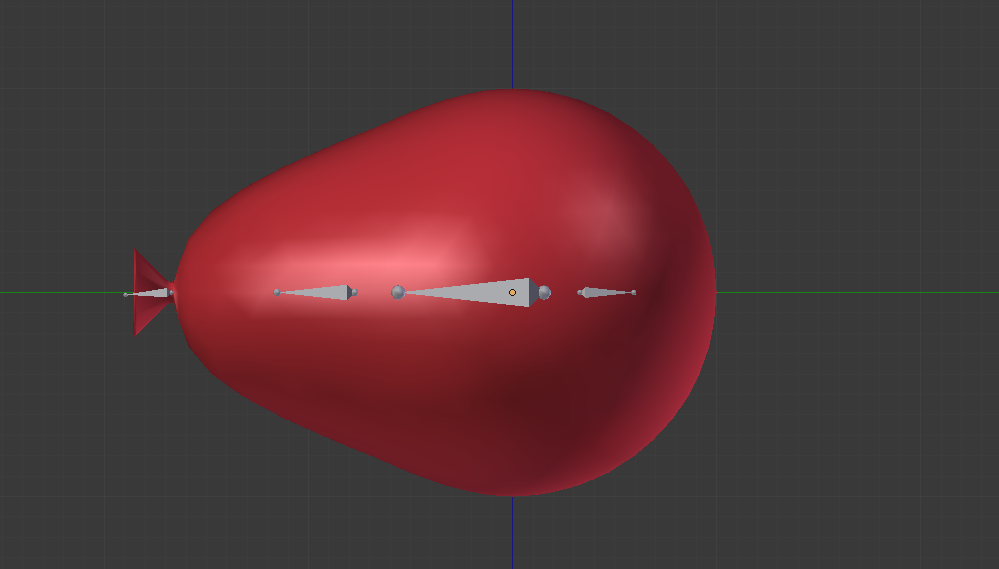
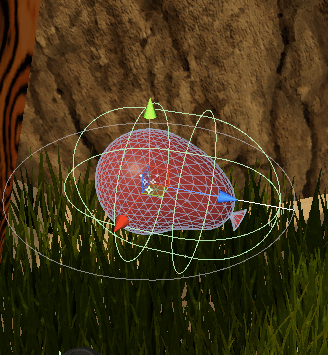
If you're not familiar with 3D modeling, it's not the end of the world, although it is a major limiting factor on your indie-dev life. I've toyed around with Blender (a free 3D modeling program) for about 3 years. It's fairly easy to learn how to make geometric or simple objects and I highly suggest making it a priority to understand the basics of 3D modeling. There isn't otherwise much to be said about this model. It's simple. One thing I might make note of is how many vertices this mesh has (around 750). If the balloon were a side object on a shelf or otherwise, I may have used less verts, but since it's going to deform, and it is a focal point of this section in Plunker, it's nice to have more.
Bones and animations
Rigging is a term in game development that refers to adding bones to a 3D model. If you're not familiar with rigging, this is another important point I would highly suggest committing some time and energy into. You won't need to learn to the extents that I have, but if you have a basic understanding then you'll be able to work well on a team and communicate with artists on a better level.
We'll want to create a popping animation to transition between a "thrown state" and a "popped state". The popped state won't have anything rendered at all, we'll just pretend that the water and the remaining rubber flew everywhere. The unity particle system is great for making animations like this, and it's usually necessary if you want to polish your game. There are several layers to our "sploosh" animation. There's the spray of water as it mists into the air, as well as the thicker explosion of water near the center. There's also a very quick flash of red balloon rubber. If you'd like to learn more about making particle systems here is where I learned a lot.
start with the central spray like this.
Then you'll add a different type of splash particle. It's all about layering. Everything looks better with a few layers of different content.
Once the splashes are in place, you'll want a flash of red rubber to bridge the gap of the balloon disappearing.
Once all of the pieces are looking ok, you can put them together. (make sure to place them under each other in a hierarchy and simulate in world space so that they scale properly and they all play together at the same time - on wake).
Layering and taking the extra time to tweak your particle systems can make parts of your game stand out in a memorable, striking way. This makes a massive difference to the look of the game, for little cost.
Behavior Programming
Where to start
SteamVR has a plugin for Unity where they provide some C# example scripts that save a lot of effort and time. If you're writing your code in C# from scratch then you're wasting a lot of time. Instead I suggest altering the provided scripts to your needs. In our case we're simply taking advantage of the basic Throwable.cs and it's easy to access OnPickup() and OnDrop() events to call our own functions when the player grabs or lets go of the balloons. If you're making a VR game, you should study these scripts to understand how they're working. I go into more detail on VR interaction in the VR-Util guide.
OnPickUp() calls a behavior function called SpawnBalloon(). This is because the balloon starts and ends in a sleep/popped state where it is an invisible object in a "balloon basket" waiting to be picked up.
OnDrop() calls a behavior function called Throw(). This sets the balloon into a state where it knows that it has been thrown and it's only waiting for a collision to pop it.
Jiggle() Triggers a jiggling animation on all of the fake balloons in the bucket to make it look like you interacted with the bucket itself.
Now I'll show you some of the code as examples
Grabbing and Throwing
Spawn() and Throw()
                                public void SpawnBalloon()
{
    popped = false; //used to keep track of if the balloon is currently in a popped state
    thrown = false; anim.SetBool(thrown_bool, false); //used keep track of if the balloon is in a thrown state and the same thing but for the animator's use
    balloon_renderer.enabled = true; //Show the balloon
    pop.SetActive(false); //deactivate popping so that it can be reactivated and "play on awake"
}

public void Throw()
{
    thrown = true; //used to keep track of if the balloon is currently in a thrown state
    anim.SetBool(thrown_bool, true); //same thing but for the animator
    anim.SetBool(smoothside_bool, false); //make sure balloon is not sloping to one side or another while thrown
    anim.SetBool(knotside_bool, false); // ||

    rb.isKinematic = false; //let the physics engine move the balloon non-kinematically
    rb.angularVelocity = Random.insideUnitSphere * rb.velocity.sqrMagnitude/10f; //give it some random spin, this is satisfying
}
Popping correctly
Pop()
                                private void OnTriggerEnter(Collider col)
{
    if (!popped && thrown) //on collision, check whether or not balloon is in a poppable state
    {
        popped = true; thrown = false; anim.SetBool(thrown_bool, false); //update what state the balloon is in with bools and the animator
        StartCoroutine(Pop()); //we use a coroutine, this is just an asynchronous function that allows us to pop and then move the object when the balloon is finished popping.
        RecieveDamage rd = col.GetComponent<RecieveDamage>(); //this looks for a script that would indicate that this is an enemy or destructible object.
        if (rd) { rd.Damage(); }
    }

}

IEnumerator Pop()
{
    pop.SetActive(true); //
    popsound.Play();
    yield return null;

    rb.isKinematic = true;
    rb.velocity = Vector3.zero;
    rb.angularVelocity = Vector3.zero;
    balloon_renderer.enabled = false;

    yield return new WaitForSeconds(1f);

    this.transform.position = barrel_script.balloon_slot.transform.position;
}
Haptics
Playing satisfying audio clips
Below you can hear the audio sound that is played. Satisfying.
Jiggling with animation layers
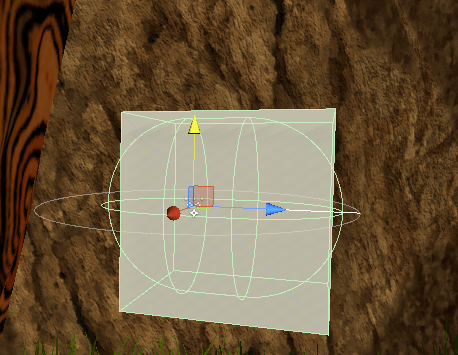
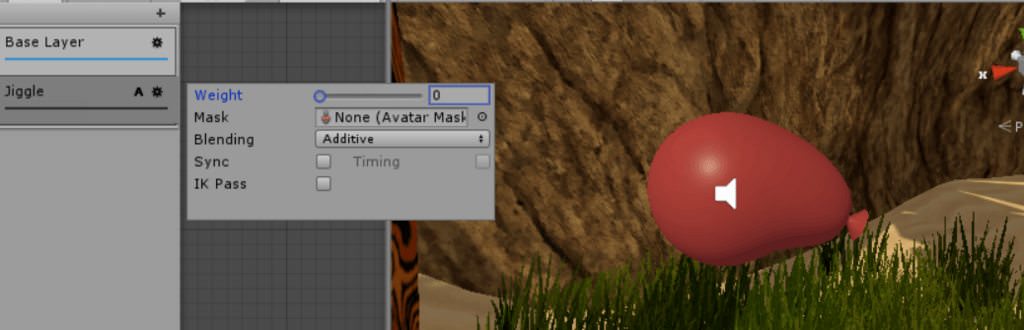
When you create a jiggle animation, you'll need to have an animation that can show the balloon jiggling without overriding any other animation states that are currently being used. For example we can used Unity's Mechanim to create animation layers to have the states blend. Say that you have an animation that stretches the balloon out one way or another and you also want to control when it jiggles separately. Well you can do that with layers. Since we're going to control jiggling independently of other animation states, we put it on it's own layer, and set it as an additive layer. We can then choose how much of that layer is blended.
If we only ever have one continuous jiggling animation, we can make the balloon infinitely jiggle on this layer and then change the layer weight to control how much jiggling gets blended in to the end result. This can be accessed and changed at runtime through code but above we can see the effect it will have by using the UI.
I'll show you our update loop for the balloon and you can see how we determine how much and how long we want to jiggle it.
Update() - Part 1 - Jiggle weight
                                void Update() {
    if (!popped && !thrown)
    {
        //calculate velocity and acceleration
        current_pos = transform.position;
        current_vel = (current_pos - last_pos) / Time.deltaTime;
        accel = (Vector3.Distance(last_vel, current_vel) * accel_factor) / Time.deltaTime;

        //Jiggle if an accel threshold is surpassed
        if (accel > accel_threshold) { jiggle_layer_weight = 0.7f; }

        //decrement jiggling until it's back to 0
        jiggle_layer_weight = Mathf.Clamp(jiggle_layer_weight - (.8f * Time.deltaTime), 0, 0.7f);
        anim.SetLayerWeight(1, jiggle_layer_weight);

        //prepare values for next frame
        last_pos = current_pos;
        last_vel = current_vel;
Since we move the balloon kinematically (by parenting it to the hand), we cannot get the velocity from the rigidbody, so we need to calculate it on our own with simple math and a few variables to keep track of displacement every frame. With this, we also calculate acceleration. If you recall, forces act on bodies in motion as a result of acceleration, so we'll only want to jiggle when there is a force jiggling the ballon (which is going to happen when the balloon moves or stops moving suddenly). When the acceleration surpasses a certain threshold we define, we can set the blend weight of our jiggling layer. We don't want this jiggling to turn off instantaneously, so we slowly decrease it until it is back to zero.
Haptic Jiggle Vibration
We already have a float variable jiggle_layer_weight that keeps track of how much our ballon is jiggling. If we use SteamVR's built in controller-vibration functions, it will be relatively easy to make it feel like the balloon is vibrating in your hands. Because we're using SteamVR's Throwable.cs script, we only have to access the correct hand and call a public function on it's Hand.cs Script. In the code below we've created a global variable, hand, that keeps track of which hand is holding the balloon. You'll want to set it when you grab the balloon and set it back to null when you let go as seen below. When you would update the animation weight, you'll also vibrate the controller by a propoertional amount. That's all there is to it. Such an easy step for what it accomplishes.
Haptic Vibration Code Additions
                                   //add these two lines to SpawnBalloon()
    if (Player.instance.leftHand.currentAttachedObject == this.gameObject) { hand = Player.instance.leftHand; }
    else if (Player.instance.rightHand.currentAttachedObject == this.gameObject) { hand = Player.instance.rightHand; }

    //put this in Throw()
    hand = null;

    //put this in Update()
    if(hand && jiggle_layer_weight > 0) {hand.controller.TriggerHapticPulse((ushort)(jiggle_layer_weight*1000f)); }
Deformation with Animation Layers
The balloon now jiggles when you shake it and gives you some physical feedback. Great, we like this. The last bit will seal the deal, and make the balloon a satisfying bit of VR experience. In this part we'll make sure the balloon deforms somewhat realistically based on how you're holding it and the effects of gravity. Lets take another look at the Update() function that we used earlier. We'll add the following lines that reference the Animator's other layer. This is why we have layers, so that we can deform the balloon and ensure that the deformations are a base animation and that jiggling is an additive animation.
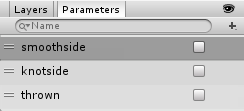
Alone, this code senses what the upward component of our normalized forward vector points either up or down by a certain amount (0.15). It then sets state variables in the animator so that we can control the animations based on it's state. Is the knot side facing downward or is the smooth side facing downward or are they both pretty balanced? In these images you can see the parameters section of the animator is where we define the variables that we're referencing in our scripts.
Animator State Transitions
To show the primary logic drivers in the animators state machine, we'll look at the transition definitions in the third picture. You can find this view by clicking on one of the arrows between two states and then setting it up from there. If you have no transitions defined you have to create transitions.
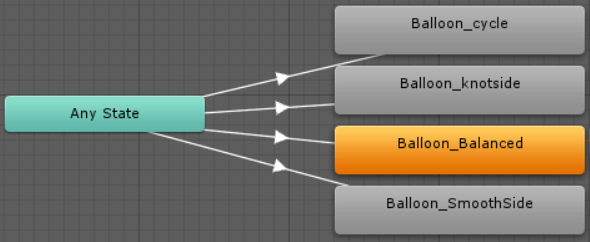
Animator State Diagram
You can also see a state diagram that is extrordinarily simple since every since state can transition to every other state and all states are mutually exclusive at any one point in time. If you've been a software developer you can probably do a lot of this on your own without the UI based tools I present here. I'm showing you this because I did that for a year or two when I started out but I've learned that the more complex animations become more manageable with this sort of UI so long as you're not doing anything completely different than what this was made for.
Polishing with Spawn Basket and environment interaction
Spawn Basket
I may have already mentioned this above, but when you've got a useable item like these water balloons, you don't want to instantiate a new prefab every single time the player grabs one, and you don't want to have a million instances of balloons laying around. The proper setup is keeping a few balloons in a deactivated state somewhere and activating them when they player needs one. This is why we have the popped state.
When the balloon is sitting in this basket, it is invisible and it has a collider that allows us to spawn the balloon. If you return to the code snippet above, spawning the balloon does a few things including enabling the renderer. This basket is also a reference to where the balloon should return once it finishes popping so that we can grab it again.
Upgrade idea
Since we only have two hands and we may want more buckets, we could rework this so that there are colliders on each basket that move the balloon into position and allow you to grab them so that we could have only two balloons present in the scene at any time rather than 2 per bucket. This is an extra exercise for you, and I may update it if I find it neccesary during development. Right now, I can't imagine having a few extra deactivated balloons causing any problems, but optimization is always fun if you have time.
Environment interactions
In Plunker these water balloons were first thought up to be weapons against sand creatures. I had created a gun to kill large enemy creatures but quickly realized that I wanted them to be made of sand. I didn't feel like shooting sand with a gun was fun or satisfying, and a friend of mine threw out the idea that I should use water instead of bullets. So here I am with awesome balloons. I've reworked the minigun turret to have larger barrels and shoot balloons as well. Also Satisfying. The last bit of development I'd like to walk you through is how to make the balloons interact with specific game objects that are meant to do something when they are hit.
Sending and Recieving Damage
In order to execute a function upon colliding with an object you'll need to create a universal script that has a few universal functions to recieve damage. This will be a script that defines the skeleton of our base class. This portion of game dev is really fun because we get to take advantage of polymorphism. We can then specify another class specifically for our sand creature that will override our original functions so that no matter what is taking damage, the balloon can reference any class that derives from RecieveDamage.
Polymorphism
Just to clear up what I mean by example: when the balloon collides with anything, we'll check if there is a script of type<RecieveDamage>. If there is a script of type<SandBoy_RecieveDamage> or type<BreakableCrate_RecieveDamage>, we will get a reference to them as long as they derive from type<RecieveDamage>. We'll be able to call public functions that appear in the base class. So if we call SendDamage(500) on the script, it may reduce the Sand Creatures health, or it could break a breakable box, depending on the overridden functions we write in the derived classes.I won't go into anymore detail here.
Here we see the base class defined with only one public virtual void function. This makes our jobs easier if we make this function warn us that we're using it since our scripts will likely not want to reference this base class (although if we had a common piece of code we could put it in here and refernce it in the override.
RecieveDamage.cs
                                public class RecieveDamage : MonoBehaviour
{
    public virtual void Damage()
    {
        Debug.LogError(gameObject.name + "Has an undefined Damage() function.");
    }
}
Next we see the subclass in our other script which has a little extra to show off why you may want to do this. I've defined an enum to contain specific places where the sandboy can be hit depending on which collider gets hit. I've chosen to serialize the field so that on the sand boy prefab I can put on of these scripts on each body part and set whether it's the head, leg, arms, etc. This way I can set it in the UI without leaving it accessible for code to access it as public. I've uysed a switch-case statement for my own readability to determine what should be done based on which part was hit. I have animations for the SandBoy to react when he is hit on different body parts, and its primary script keeps track of its health.
RecieveDamage_Sandboy.cs
                                public enum DamageZone { Head, Body, L_Arm, R_Arm, L_Leg, R_Leg }

public class RecieveDamage_Sandboy : RecieveDamage
{
    [SerializeField] DamageZone damage_zone;
    SandBoy sb;

    private void Start()
    {
        sb = transform.root.GetComponent<SandBoy>();
        if (sb == null) { Debug.Log("Sandboy Script not found from Damage script attached to: " + this.name); }
    }

    public override void Damage()
    {
        switch (damage_zone)
        {
            case DamageZone.Head:
                sb.Damage(66);
                sb.anim.SetTrigger("Headshot");
                return;
            case DamageZone.Body:
                sb.Damage(33);
                sb.anim.SetTrigger("Bodyshot");
                return;
            case DamageZone.L_Leg:
                sb.Damage(25);
                sb.anim.SetTrigger("Bodyshot");
                return;
            case DamageZone.R_Leg:
                sb.Damage(25);
                sb.anim.SetTrigger("Bodyshot");
                return;
            case DamageZone.L_Arm:
                sb.Damage(25);
                sb.anim.SetTrigger("Arm_L_shot");
                return;
            case DamageZone.R_Arm:
                sb.Damage(25);
                sb.anim.SetTrigger("Arm_R_shot");
                return;
            default:
                sb.Damage(33);
                sb.anim.SetTrigger("Bodyshot");
                return;
        }
    }
}
I honestly could go deeper and continue writing about every facet of this entire game forever, but then I may never finish the game itself. This is the stopping point for now; I hope you learned a lot from following along and feel free to use whatever you can grab from this in any way you'd like, commercial or otherwise. Unless you're a dirty asset flipper and you're literally releasing a game where you hold and throw water balloons at walls. In which case I can't imagine it would sell well and I'm not worried about it hurting my project. Cheers.
Resources
BalloonAssets.zip
If you're going to use my source code for your project or even poke around in it, please read through the rest of this walkthrough. It will save you time to understand it before you drag and drop it into your project. Ideally, you'll take pieces that you want and make a very modified version once you understand exactly what all of the parts do. I want to educate rather than give away free code, but again, you're free to do whatever you want with this, commercial or otherwise! If you'd like to make it rain, here is my money catching bucket. https://www.paypal.me/AuggoDoggo/5
Q&A
If you felt any part of this guide was awkwardly paced, or hard to follow, please send me an email at August@AuggoDoggoGames.com and give me a chance to clear it up and improve at sharing my code creations. In the future, this is where I'll post answers to specific questions that aren't simply answered by updating a portion of the guide.